How to build a simple starter house in Minecraft?
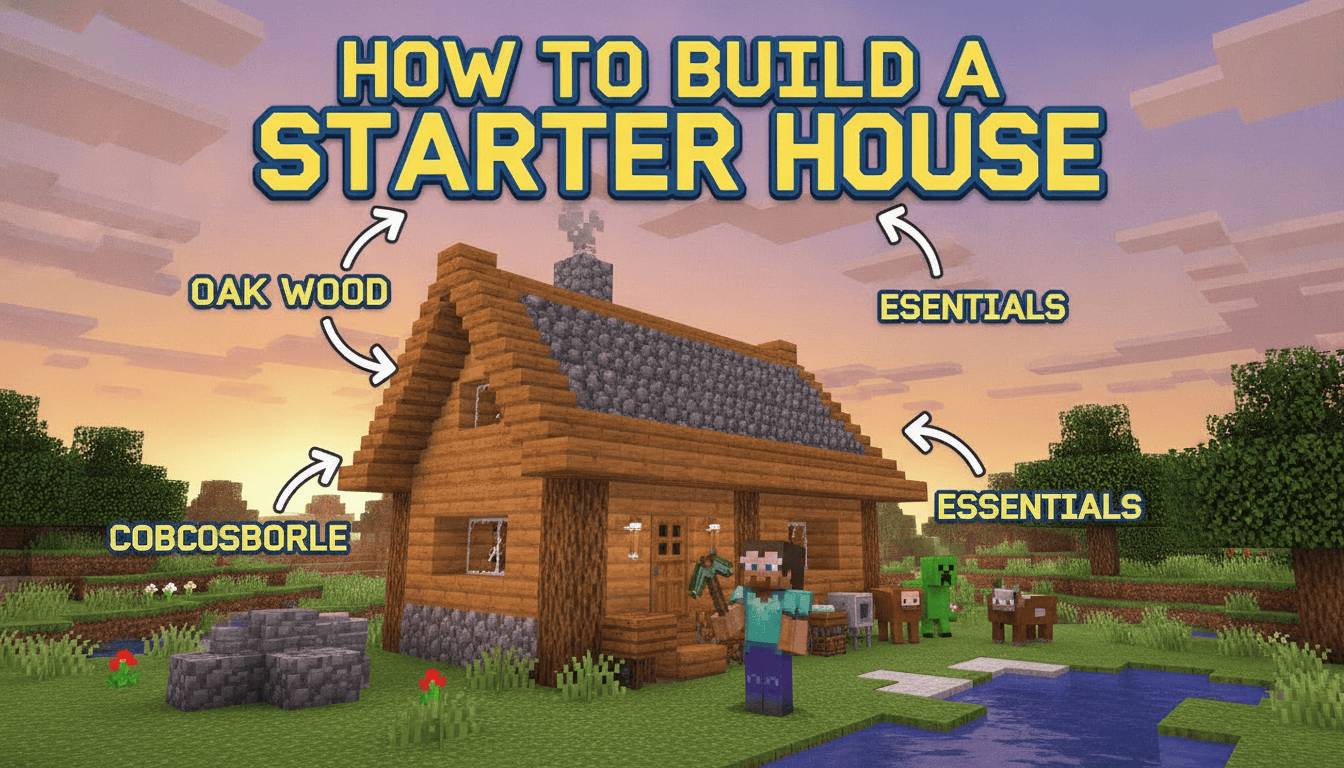
Learning how to build a simple starter house in Minecraft is a fundamental skill that will ensure your survival and provide a safe haven from the dangers of the night. This guide will walk you through collecting resources, constructing your first shelter, and furnishing it with essential utilities.
What You’ll Need
To construct your basic starter house, you’ll need the following materials and tools:
- Wood Logs (e.g., Oak, Spruce): Gathered by punching or chopping down trees. These are your primary building blocks and fuel source.
- Wood Planks: Crafted from wood logs (one log yields four planks). Used for walls, floors, roofs, and crafting other items.
- Cobblestone: Mined from stone blocks using a pickaxe. Stone is common underground or in mountains. Used for furnaces and can be an alternative building material.
- Sand: Found in deserts, beaches, and riverbeds. Smelted in a furnace to create glass.
- Torches: Crafted using one coal (or charcoal) and one stick. Coal is mined underground; charcoal is made by smelting wood logs. Essential for lighting your home and preventing mob spawns.
- Crafting Table: Crafted using four wood planks in a 2×2 grid. Your primary tool for crafting most items.
- Furnace: Crafted using eight cobblestone blocks in a U-shape around the crafting grid’s center. Used for smelting ores, cooking food, and making charcoal/glass.
- Chests: Crafted using eight wood planks in a U-shape around the crafting grid’s center. Essential for storing your items safely.
- Bed: Crafted using three wool (from sheep) and three wood planks. Allows you to skip the night and set your spawn point.
- Door: Crafted using six wood planks in two vertical columns. Provides a secure entry and exit.
- Glass Panes: Crafted using six glass blocks in two vertical columns. Used for windows.
- Pickaxe: Essential for mining cobblestone and other stone-type blocks. Craft with three planks/cobblestone/iron ingots (depending on material) and two sticks.
Step-by-Step
Follow these steps to build your simple, yet effective, starter house:
1. Gather Resources
Before you start building, you need to collect a substantial amount of raw materials.
* Wood: Punch or chop down several trees until you have at least 20-30 wood logs. This will give you a good starting supply of planks.
* Cobblestone: Once you have some wood, craft a wooden pickaxe (three wood planks across the top of a crafting grid, two sticks in the middle column below the planks). Use this to mine at least 20-30 cobblestone blocks. You’ll need it for a furnace and potentially for your walls.
* Sand: Collect around 6-10 blocks of sand if you plan on having windows.
* Wool: Find and shear (or kill) three sheep to get three blocks of wool for a bed. If you don’t have shears, you can kill them, but shearing yields more wool.
* Coal/Charcoal: Mine some coal if you find it. If not, smelt a wood log in your furnace (once crafted) to make charcoal.
2. Choose a Location
Selecting the right spot for your house is crucial for early-game survival and future expansion.
* Flat Terrain: Look for a relatively flat area to minimize terraforming.
* Resource Proximity: Ideally, choose a location near trees (for wood), mountains or caves (for stone/coal), and perhaps a water source.
* Spawn Point: Building relatively close to your initial world spawn point is highly recommended. If you die before setting a new spawn with a bed, you won’t have to travel far to retrieve your items.
* Avoid Hazards: Steer clear of deep ravines, large bodies of lava, or areas with an abundance of hostile mobs.
3. Lay Out the Foundation
A simple rectangular footprint is easiest for a starter house.
* Dimensions: Start with a modest size, such as a 5×5, 7×7, or 7×9 block rectangle. A 7×7 internal space is often comfortable.
* Material: Use wood planks or cobblestone for the base outline. Place blocks directly on the ground to mark out your chosen dimensions. For a 7×7 external house, you would place 7 blocks in a line, then 5 more blocks perpendicular to the end of that line, and so on, forming a hollow square.
4. Build Walls
Once your foundation is laid, it’s time to raise the walls.
* Height: Construct the walls at least three blocks high. This height allows you to jump inside without hitting your head and provides enough space for a door and windows.
* Material: You can use wood planks, cobblestone, or a mix of both. Using wood planks for the main structure and cobblestone for the corners or base can add a nice touch.
* Door and Window Openings: As you build the walls, leave a two-block high, one-block wide opening for your door, and one-block high, one-block wide (or wider) openings for windows.
5. Add a Door and Windows
These provide access and light while keeping you safe.
* Door Placement: Craft a door using six wood planks. Stand outside your house and place the door in the opening. This ensures the door opens outwards, allowing you to attack mobs through the gap without them hitting you.
* Windows: Smelt your sand into glass blocks in a furnace (one sand block yields one glass block). Then, craft six glass blocks into six glass panes. Place the glass panes into your window openings. This allows you to see outside and lets light in, improving visibility during the day.
6. Construct a Roof
A roof is essential to protect you from falling objects and hostile mobs that might spawn above.
* Simple Flat Roof: The easiest option is to use wood planks or slabs to create a flat roof. Simply extend blocks over the top of your walls until the entire area is covered.
* Sloped Roof (Optional): For a slightly more aesthetic look, you can craft wood stairs and use them to create a sloped roof.
* Overhang: Regardless of the roof type, add a one-block overhang around the perimeter. This adds visual appeal and can offer a small amount of extra protection from projectiles or falling mobs.
7. Light the Interior and Exterior
Lighting is critical for safety. Hostile mobs (like zombies, skeletons, spiders, and creepers) will spawn in dark areas.
* Interior Lighting: Craft torches (one coal/charcoal + one stick). Place torches inside your house, ensuring no dark spots remain. A good rule of thumb is to place torches every ~7 blocks. This will prevent any hostile mobs from spawning within your home.
* Exterior Lighting: Place torches around the exterior of your house, especially near the door and corners. This creates a safe perimeter and helps you see your way home at night.
8. Place Essential Utilities
Now that your house is built, it’s time to make it functional.
* Crafting Table: Place your crafting table inside. This is where you’ll do most of your crafting.
* Furnace: Place your furnace next to the crafting table. Use it to cook food, smelt ores, and make glass.
* Bed: Place your bed. Right-click on it to set your spawn point. You can then sleep through the night, instantly changing it to day and avoiding night-time dangers.
* Double Chest: Craft two chests and place them side-by-side to create a large double chest. This provides ample storage for your collected resources and items, keeping them safe even if you die.
Java vs. Bedrock Differences
While the core process of building a simple starter house remains consistent across Minecraft’s two main editions, there are some underlying differences:
- Fundamental Building: The basic blocks, crafting recipes for essential items (crafting table, furnace, chest, bed, door, glass panes), and the general approach to constructing a functional shelter are virtually identical in both Java and Bedrock Editions.
- Platform Availability: Java Edition is exclusive to PC (Windows, macOS, Linux), offering a more open platform for community-made mods. Bedrock Edition is designed for cross-platform play, available on PC (Windows 10/11), consoles (Xbox, PlayStation, Nintendo Switch), and mobile devices (Android, iOS), and features an official in-game marketplace for add-ons and content.
- Technical Mechanics: Differences primarily emerge in more advanced mechanics like Redstone (Java has “quasi-connectivity” for pistons and dispensers, Bedrock does not), world generation algorithms (though often visually similar), and specific command syntax. These distinctions typically do not affect the basic construction of a starter house.
- Performance: Bedrock Edition is generally optimized to run smoother on a wider range of hardware due to its C++ codebase, while Java Edition, being written in Java, can sometimes be more resource-intensive, especially with complex mod setups.
For the purpose of building a simple starter house, players on either Java or Bedrock Edition can follow this guide interchangeably.
Version Notes
The core mechanics for building a simple starter house have remained remarkably consistent across recent Minecraft versions. Whether you’re playing on version 1.18, 1.20+, or the latest 1.21.10, the steps for gathering resources, crafting essential items, and constructing a basic shelter are fundamentally the same. The game’s developers have maintained these foundational elements to ensure a consistent and accessible early-game experience for all players.
It’s worth noting that very early versions of Java Edition (specifically during its “Indev” phase) did include a feature where players would sometimes spawn near a pre-generated “starting house.” However, this feature was removed in later development stages, making player-built shelters the standard and necessary survival mechanic we know today.
Common Mistakes to Avoid
Even experienced players can make mistakes, but new players are especially prone to these common pitfalls:
- Not Building Shelter Before Nightfall: The most critical mistake! As soon as the sun starts to set, hostile mobs begin to spawn. Always prioritize building at least a rudimentary dirt or cobblestone box before the first night.
- Building a Flat, Featureless Box: While functional, a simple square box made of one block type can be uninspiring. Try to add depth by using different blocks for corners or by insetting/outsetting sections of your walls.
- Lack of Shape Variation: Don’t limit yourself to only square or rectangular designs. Even a simple L-shape or T-shape can add more visual interest and provide distinct areas within your home.
- Using Only One Block Type: Monochromatic houses can look bland. Mix complementary block textures, such as wood planks with logs, or cobblestone with stone bricks, to add detail and avoid a monotonous appearance.
- Forgetting a Roof Overhang: An overhang not only adds to the aesthetic appeal of your house but can also provide a small amount of extra protection from projectiles or mobs that might fall onto your roof.
- Insufficient Lighting: A dimly lit interior or exterior is an open invitation for hostile mobs to spawn. Ensure adequate torch placement inside and around your house to maintain a safe environment.
- Placing Doors Incorrectly: Always place doors from the outside of your house. This ensures they open outwards, allowing you to create a small gap to attack mobs without taking damage yourself. If placed from the inside, they open inwards, potentially trapping you or making you vulnerable.
- Building Too Far from Spawn: If you die and haven’t set your spawn point with a bed, you’ll reappear at the world’s initial spawn point. Building too far away can make retrieving your dropped items a frustrating and time-consuming journey.
- Using Lava in Wooden Structures: Lava is a powerful light source and a destructive tool, but it’s also a significant fire hazard. Placing lava near or inside a wooden house will almost certainly result in your home burning down. Use it with extreme caution and only in fireproof enclosures.
FAQ
Q: How much wood do I need for a starter house?
A: For a basic 7×7 house, aim for at least 64-100 wood logs (which convert to 256-400 planks) to cover walls, roof, and essential crafting. It’s always better to have extra.
Q: Can I use dirt for my first house?
A: Yes, dirt is a very quick and easy material for a temporary, emergency shelter on your first night. It provides immediate protection. You can upgrade to wood or cobblestone later.
Q: How do I make glass for windows?
A: Place sand blocks into a furnace along with a fuel source (like wood logs, charcoal, or coal). Each sand block will smelt into one glass block. You then craft six glass blocks into six glass panes.
Q: Why is a bed so important?
A: A bed allows you to skip the night, preventing hostile mob spawns and letting you continue gathering resources or building in daylight. It also sets your spawn point, so if you die, you’ll respawn safely in your house.
Q: What’s the best block for a starter house?
A: Wood planks are excellent due to their abundance and ease of gathering. Cobblestone is also a great choice, being blast-resistant (good against Creepers) and fireproof, though it takes longer to mine. A mix of both offers good aesthetics and functionality.
Building your first house in Minecraft is a rewarding experience that marks the true beginning of your survival journey.

