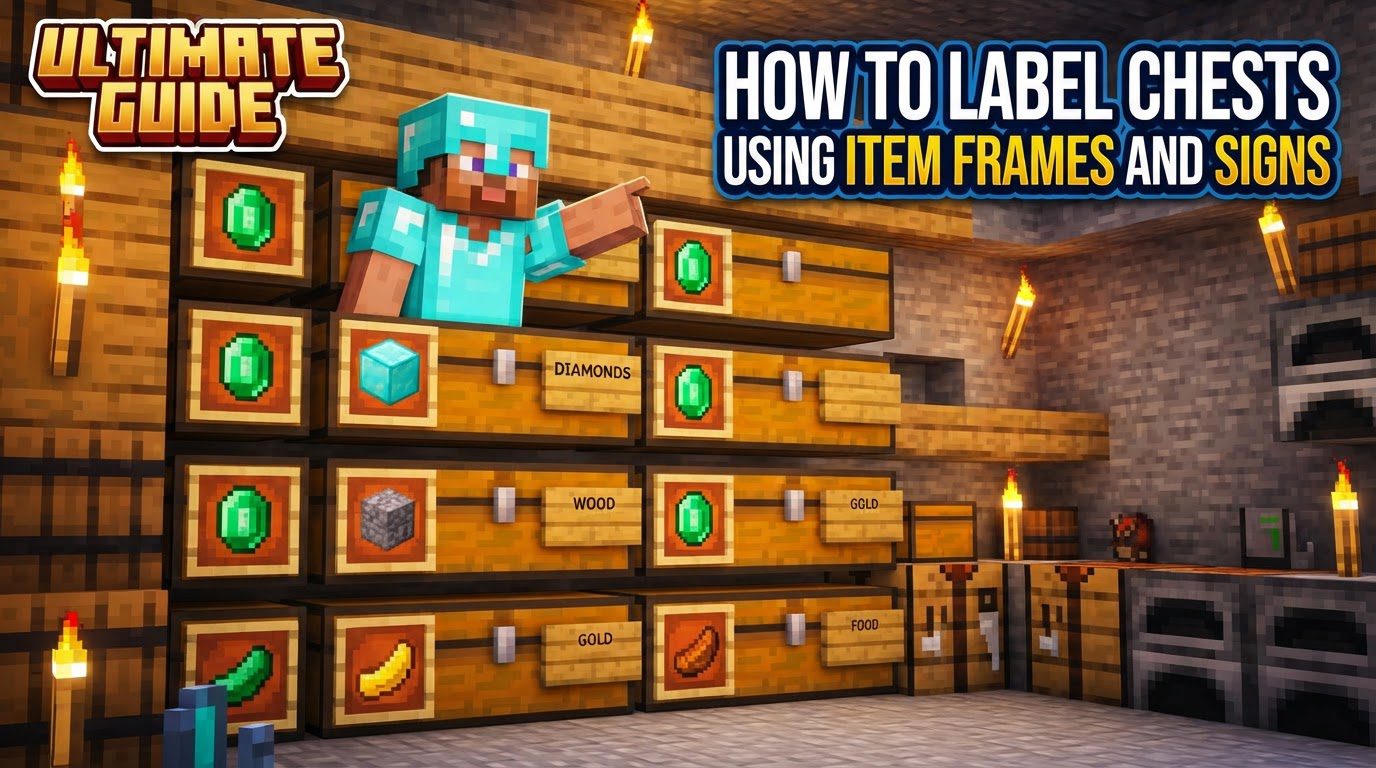
Labeling Chests Using Item Frames and Signs (Step by Step)
Mastering Your Storage: Labeling Chests with Item Frames and Signs
In the expansive world of Minecraft, effective organization is paramount to a successful and enjoyable experience. As your adventures progress, your inventory will quickly fill with a diverse array of blocks, items, and resources. Without a systematic approach to storage, finding that one specific item can become a frustrating and time-consuming endeavor. This comprehensive guide will walk you through the essential techniques of labeling your chests using two primary in-game items: signs and item frames. By mastering these methods, you will transform your cluttered storage rooms into efficient, easily navigable hubs, ensuring that every valuable resource is just a glance away.
Understanding the Core Mechanics of Chest Labeling
Before diving into the step-by-step processes, it’s crucial to grasp the fundamental mechanics that enable seamless chest labeling. These mechanics ensure that you can interact with your chests in a specific way to attach labels without accidentally accessing their contents.
- The “Sneak” (Crouch) Mechanic: The most vital mechanic for placing signs or item frames directly onto a chest without opening its inventory is to “sneak,” also known as crouching. On PC, this action is typically performed by holding down the Shift key. When you are sneaking, your character’s hitbox is slightly reduced, and your interactions with certain blocks change. Specifically, attempting to place a block or item on an interactive block like a chest while sneaking will prioritize placing the item *on* the block rather than activating the block’s primary function. Forgetting this step is a common mistake that will consistently lead to opening the chest’s inventory instead of placing your label.
- Item Frames as Entities: A key aspect of item frames that makes them so versatile for labeling is that they are considered entities, not solid blocks. This distinct characteristic allows them to share the same block space with other non-solid elements, including signs. This means you can place both an item frame and a sign directly onto the same face of a chest, providing a powerful combination for detailed and visually rich labels.
- Sign Customization: Signs offer a degree of visual customization that enhances their utility as labels. Their text can be made brighter and more visible, especially in dimly lit areas, by interacting with them using glow ink sacs. Furthermore, signs can be dyed different colors. This capability is not just aesthetic; it serves as a powerful tool for visual categorization, allowing you to color-code your storage system for rapid identification of chest contents.
Labeling with Signs: A Step-by-Step Guide
Signs are a fundamental and highly effective way to add descriptive text labels to your chests. They are relatively inexpensive to craft and offer immediate clarity regarding a chest’s contents.
- Step 1: Craft Your Signs
- To begin, you will need to craft a sign. The recipe requires six wooden planks of any type and one stick. Arrange the six wooden planks in the top two rows of a crafting grid, filling all three slots in each row, and place the single stick in the center slot of the bottom row. This recipe yields three signs, providing a good starting quantity for your labeling needs.
- Step 2: Prepare for Placement
- Once you have a sign in your hand, position yourself in front of the chest you wish to label. Crucially, before attempting to place the sign, hold down the sneak (crouch) key (typically Shift on PC). This action prevents the chest from opening when you interact with it.
- Step 3: Place the Sign
- While sneaking, right-click on the desired face of the chest with the sign in your hand. The sign will instantly attach to the chest’s surface. The specific face you right-click on will determine where the sign is placed, allowing for front, side, or even top placement if accessible.
- Step 4: Input Your Label Text
- Upon successful placement, a text editor interface will automatically appear. This interface allows you to type your desired label directly onto the sign. Keep your labels concise and descriptive for optimal organization. After entering your text, press the “Done” button to finalize the sign’s inscription. The text will then be permanently displayed on the sign.
- Step 5 (Optional): Customize Your Sign
- Signs offer additional customization options after placement. To change the color of the sign’s text, simply right-click the placed sign with any dye in your hand. This can be used for aesthetic purposes or, more practically, for creating a color-coded storage system. To make the text brighter and more easily readable, especially in low-light conditions, right-click the placed sign with a glow ink sac. This will make the text emit a subtle light, enhancing visibility.
Labeling with Item Frames: A Step-by-Step Guide
Item frames provide a visual representation of a chest’s contents, allowing for quick, iconic identification. They are particularly useful for items that have a distinct and easily recognizable appearance.
- Step 1: Craft Your Item Frames
- To create an item frame, you will need eight sticks and one leather. In a crafting grid, place the eight sticks around the perimeter of the grid, filling all outer slots, and place the single piece of leather in the very center slot. This recipe yields one item frame. Gather a sufficient number of item frames based on the number of chests you intend to label.
- Step 2: Prepare for Placement
- Hold the item frame in your hand and position yourself in front of the chest you wish to label. Just as with signs, it is imperative to hold down the sneak (crouch) key (Shift on PC) before proceeding. This prevents you from inadvertently opening the chest’s inventory.
- Step 3: Place the Item Frame
- While sneaking, right-click on the desired face of the chest with the item frame in your hand. The item frame, being an entity, will attach itself to the chest’s surface without interfering with the chest’s functionality. This placement allows it to occupy the same block space as a sign, if desired.
- Step 4: Display Your Item Label
- Once the item frame is placed, select the item you wish to display as the label from your inventory. This item should ideally be representative of the chest’s contents (e.g., an iron ingot for an “Iron Ore” chest). Right-click the placed item frame with this item in your hand. The item will appear within the frame, serving as a clear visual indicator.
- Step 5 (Optional): Rotate the Item
- For aesthetic purposes or to better highlight a specific feature of the displayed item, you can rotate the item within the frame. Simply right-click the item within the frame multiple times. Each right-click will rotate the item by 45 degrees, allowing you to choose the orientation you prefer.
Advanced Techniques and Best Practices for Optimal Organization
Leveraging both signs and item frames, along with strategic placement and customization, can elevate your storage system to new levels of efficiency.
- Combine Item Frames and Signs for Comprehensive Labels: One of the most effective strategies is to utilize both an item frame and a sign on the same chest. Because item frames are entities, they can coexist with signs on the same block face. This combination provides the best of both worlds: a clear visual icon from the item frame (e.g., a diamond for a diamond chest) and a descriptive text label from the sign (e.g., “Precious Gems – Diamonds Only”). This dual approach ensures that anyone, including new players or those unfamiliar with your system, can instantly understand the chest’s purpose.
- Implement Color-Coded Sign Categories: Harness the power of colored signs to create an intuitive, color-coded storage system. For instance, you could use green dye on signs for chests containing farming-related items (seeds, crops, hoes), red dye for chests dedicated to ores and minerals (coal, iron, gold), blue for aquatic items, or yellow for building blocks. This visual categorization allows for incredibly quick identification of chest categories, significantly reducing the time spent searching for items. A quick scan of your storage room will immediately highlight the section you need to interact with.
- Consider Adjacent Block Placement for Signs: While placing signs directly on chests is common, you might sometimes prefer to place signs on an adjacent block, such as the wall directly above or next to the chest. This approach can be beneficial if you prefer a “floating” sign appearance or if you wish to avoid any potential for accidental interaction with the chest itself when manipulating the sign. This method also frees up the chest’s face solely for an item frame, if that is your preferred primary label.
- Rename Items for Enhanced Item Frame Labels: For an extra layer of detail and personalization, you can rename an item using an anvil before placing it into an item frame. When a renamed item is placed in an item frame, its custom name will be displayed as part of the label when you look at it. This allows for highly specific labels, such as “My Pickaxe – Fortune III” or “Special Wheat Harvest,” providing more context than the item’s default name alone.
- Waterlogging Chests (with Caution): While primarily a defense mechanism, waterlogging chests (by placing water in the same block space) can make them resistant to explosion damage. However, it’s important to note that while chests themselves become more durable in this state, waterlogging may affect signs placed directly on them, potentially causing them to break or behave unexpectedly due to the water flow or block state changes. This is more of a situational consideration than a labeling technique, but it’s good to be aware of the potential interaction.
Common Mistakes to Avoid for a Smooth Labeling Experience
Even with clear instructions, certain pitfalls can hinder your labeling efforts. Being aware of these common mistakes will save you time and frustration.
- Forgetting to Sneak (Crouch): This is by far the most frequent mistake. If you attempt to place a sign or an item frame on a chest without holding down the sneak (crouch) key, you will invariably open the chest’s inventory instead. This can be particularly annoying if you’re trying to quickly label many chests. Always remember to hold Shift (on PC) when placing labels directly onto storage containers.
- Potential Game Lag from Excessive Item Frames: While item frames are incredibly useful, they are entities. Using a very large number of item frames in a confined area, such as a densely packed storage room with hundreds of chests each bearing an item frame, can sometimes contribute to game lag. This performance impact is more noticeable on less powerful systems or in servers with many entities. If you experience significant slowdowns, consider using signs as your primary labeling method, or space out your item frames more judiciously.
By diligently applying these techniques and understanding the underlying mechanics, you will transform your Minecraft storage into an organized, efficient, and visually appealing system. Happy crafting and organizing!
Tags:
YOU MAY ALSO LIKE...