How to set up an automatic kelp farm for fuel in Minecraft?
Setting up an automatic kelp farm for fuel in Minecraft is a fantastic way to generate a renewable and highly efficient power source for all your smelting needs. This guide will walk you through building a reliable, self-sustaining kelp farm that converts raw kelp into dried kelp blocks, ready to fuel your furnaces and smokers.
What You’ll Need
The exact quantities will depend on the scale of your farm, but here’s a general list of items you’ll need and where to get them:
- Building Blocks: 3-4 stacks (e.g., Stone, Cobblestone, Quartz, Glass). These are essential for constructing the farm’s structure. Cobblestone is abundant, while glass allows you to see inside.
- Kelp: 16+ pieces. Found growing naturally in ocean biomes. You’ll need these to plant the initial kelp in your farm.
- Water Buckets: 2 or more. Crafted from 3 iron ingots in a V-shape, then used on a water source to fill. You’ll need these to create an infinite water source and fill your farm with water source blocks.
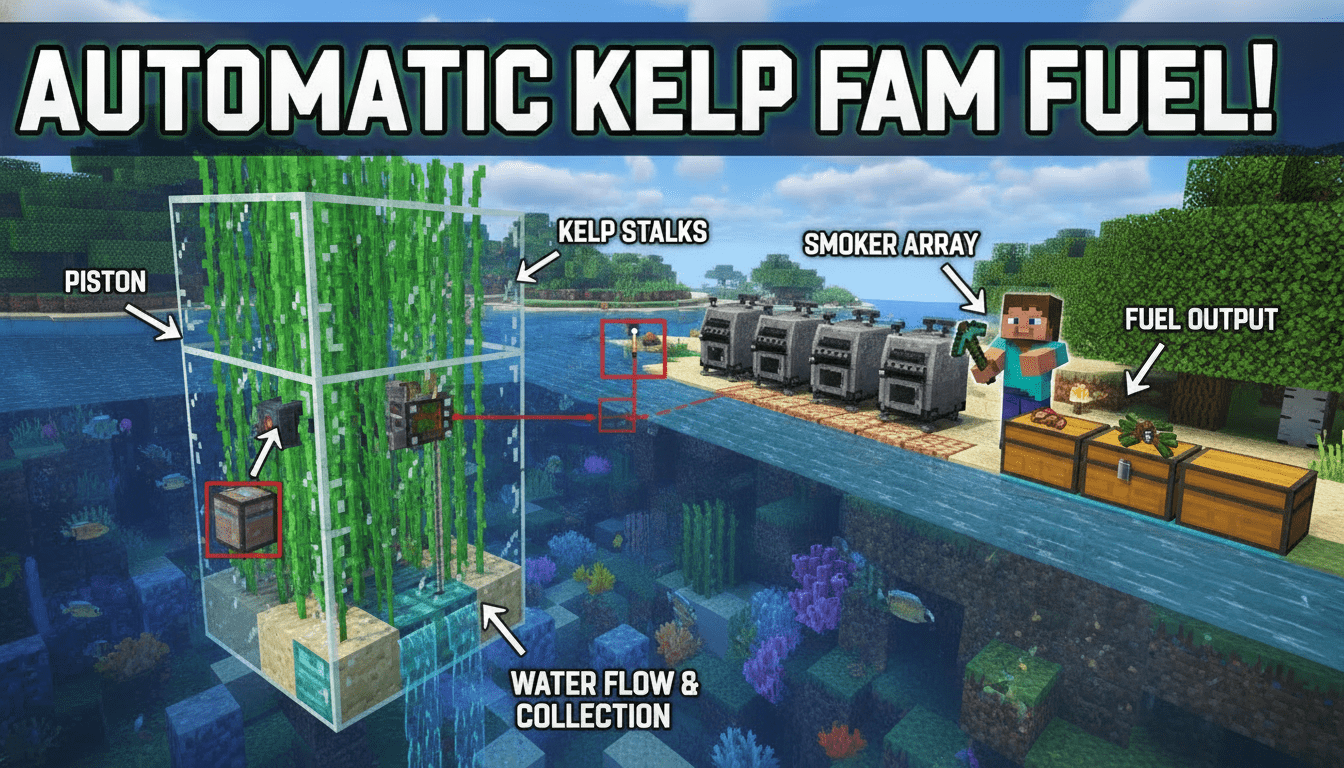
- Pistons: 6-16+ (depending on farm length). Crafted from 3 planks, 4 cobblestone, 1 iron ingot, and 1 redstone dust. These will break the kelp when it grows.
- Observers: 6-16+ (depending on farm length). Crafted from 6 cobblestone, 2 redstone dust, and 1 nether quartz. Observers detect when kelp grows and trigger the pistons.
- Redstone Dust: 6-16+ (depending on farm length). Mined from redstone ore, found deep underground. Used to connect observers to pistons.
- Hoppers: 1-13+ (for collection and item transfer). Crafted from 5 iron ingots and 1 chest. These are crucial for collecting harvested kelp and transferring it to furnaces and storage.
- Chests: 2-10+ (for storage). Crafted from 8 planks. Used for storing raw kelp, dried kelp, and dried kelp blocks.
- Slabs: 1 stack (any type, e.g., Stone Slabs, Cobblestone Slabs). Crafted from 3 blocks of the same material. Useful for containing water and preventing kelp from escaping.
- Smokers/Furnaces: 1-4+ (for smelting kelp).
- Furnace: Crafted from 8 cobblestone. A general-purpose smelter.
- Smoker: Crafted from 4 logs/wood and 1 furnace. Smokes food items (like kelp) twice as fast as a regular furnace. Recommended for kelp.
- Crafter: 1 (Minecraft 1.21+). Crafted from 5 iron ingots, 2 redstone dust, 1 dropper, and 1 crafting table. This allows for fully automated crafting of dried kelp blocks.
- Optional: Rails, Hopper Minecarts (for larger, more complex collection systems). Rails are crafted from 6 iron ingots and 1 stick, Hopper Minecarts from 1 hopper and 1 minecart.
Step-by-Step
This guide focuses on a common and efficient piston/observer design for an automatic kelp farm.
1. Build the Base Platform
Start by creating a base platform for your farm. A good starting size is 10 blocks long by 4 blocks wide, but you can extend this to make a larger farm. This platform will be the floor of your kelp growing area.
2. Create the Water Channels
- On top of your base platform, build walls around the perimeter, at least 2 blocks high.
- Inside this enclosed area, place a row of building blocks (e.g., dirt, sand, stone) where the kelp will be planted. This row should be 1 block wide and run the length of your farm.
- Fill the area above these planting blocks with water source blocks. It’s crucial that every water block is a source block for optimal kelp growth and to prevent kelp from breaking in Bedrock Edition. You can achieve this by placing water in a checkerboard pattern or by creating an infinite water source (a 2×2 square of water, or two water blocks with a gap in between) and scooping from it.
3. Plant the Kelp
- Break the blocks you used for planting (dirt, sand, etc.) directly beneath the water source blocks.
- Replace these with your chosen permanent base blocks (e.g., stone, sand, dirt).
- Plant one piece of kelp on each of these base blocks. Ensure the kelp is fully submerged in water.
4. Place the Pistons
- Above the row of planted kelp, leave one block of empty space (this is where the kelp will grow).
- Place a row of pistons facing inwards towards the kelp, one block above the planted kelp. These pistons will extend and break the kelp when it grows tall enough. The exact height can vary, but placing them around 12-14 blocks above the planting layer is a good starting point to account for kelp’s random “age” growth.
5. Position the Observers
- Behind each piston, place an observer. The “face” of the observer (the side with the red dot) should be pointing towards the kelp, and the “output” (the side with the red square) should be facing away from the kelp, towards where you’ll place redstone.
- When kelp grows into the block directly in front of the observer’s face, the observer will detect this change.
6. Wire with Redstone
- Connect the output of each observer to its corresponding piston using redstone dust.
- Place redstone dust on the block directly behind the observer. This will transmit the signal from the observer to the piston. When an observer detects kelp growth, it will send a short pulse, powering the piston to break the kelp.
7. Create Water Flow for Collection
- Above the pistons, build a roof or a layer of slabs.
- On one side of the kelp growing area, create a water stream that flows across the top of the water and pushes all harvested kelp towards a designated collection point. This can be done by placing water source blocks along one edge, allowing them to flow across.
- Ensure the water flow is strong enough to push all items to the collection point.
8. Set Up the Collection System
- At the end of the water stream, dig a channel and place hoppers. These hoppers should be facing downwards into chests for initial storage of the raw kelp. You might need multiple hoppers leading into a larger chest array if your farm is very productive.
9. Build the Smelting and Fuel Loop (for Dried Kelp Blocks)
This is where the raw kelp is processed into efficient fuel.
- Raw Kelp to Smelters: Place hoppers on top of your smokers (recommended for speed) or furnaces. Connect these hoppers to the chest containing your raw kelp from the collection system. This will automatically feed raw kelp into the smelters.
- Smelted Kelp Collection: Place hoppers underneath your smokers/furnaces. These hoppers will collect the dried kelp once it’s smelted. Connect these hoppers to a chest for temporary storage of dried kelp.
- Automated Dried Kelp Block Crafting (Minecraft 1.21+):
- Place a Crafter.
- Configure the Crafter to craft dried kelp blocks (9 dried kelp in a 3×3 grid).
- Use hoppers to feed dried kelp from your temporary storage chest into the input slots of the Crafter.
- Place another hopper underneath the Crafter to collect the newly crafted dried kelp blocks. This hopper should lead into a chest for storing your fuel.
- Self-Sustaining Fuel Loop:
- Connect a hopper from the chest containing your dried kelp blocks to the side or bottom fuel input of your smokers/furnaces. This will automatically feed the dried kelp blocks back into the smelters as fuel, creating a truly self-sustaining system.
- You might want to add a switch or a separate chest for manual collection of excess dried kelp blocks if you need them for other purposes.
Tips for Efficiency
- Optimal Observer Height: Kelp has a random “age” when planted (0-24), which affects its maximum growth height (2-26 blocks). If your kelp isn’t consistently triggering observers, try adjusting the observer height. Placing them higher (e.g., 12-14 blocks above the base) increases the chance of kelp growing tall enough to be detected.
- Chunk Alignment: Build your entire farm within a single chunk if possible. Farms that cross chunk borders can experience inconsistent growth or redstone issues, especially when chunks are loaded/unloaded. You can see chunk borders by pressing F3 + G (Java Edition).
- Smokers for Speed: While furnaces work, smokers smelt food items (like kelp) twice as fast. For a high-yield kelp farm, using smokers will significantly speed up your fuel production.
- Enclose the Farm: Add walls and a roof to your farm to prevent harvested kelp from flying out of the collection area, especially in windy conditions or if pistons push items unexpectedly.
- Expand Horizontally: To increase output, simply extend the length of your kelp rows, adding more pistons, observers, and redstone.
- Bedrock Edition Considerations:
- Water Source Blocks: In Bedrock, kelp can break if it grows into a flowing water block. Ensure all water blocks in your growing area are source blocks.
- Bone Meal Farms: Passive kelp farms relying solely on natural growth can be less efficient in Bedrock. For maximum output, consider using a bone meal-powered dispenser system that regularly applies bone meal to the kelp for rapid growth. This requires a separate bone meal farm or a constant supply.
FAQ
Q: Why use dried kelp blocks as fuel instead of other common fuels?
A: Dried kelp blocks are highly efficient, smelting 20 items per block. They are also completely renewable and can be fully automated, making them a “set it and forget it” fuel source that doesn’t require mining coal or chopping wood.
Q: Can I use this farm for food as well?
A: Yes! Dried kelp itself is a food source. While it doesn’t restore much hunger or saturation, it’s eaten very quickly, making it useful for quick hunger top-ups. You can divert some of the dried kelp before it’s crafted into blocks for this purpose.
Q: What if my kelp isn’t growing tall enough to trigger the observers?
A: This is often due to the kelp’s random “age” mechanic. Try placing your observers and pistons higher up, giving the kelp more room to grow before detection. Alternatively, consider a bone meal-powered design for more consistent growth.
Q: Why are my items escaping the collection system?
A: This usually happens if the farm isn’t fully enclosed. Add walls and a roof to prevent kelp from being pushed out of the water stream by pistons or flying out due to physics interactions. Ensure your water stream is robust and directs all items efficiently to the hoppers.
Q: Do I need a Crafter for this farm to work?
A: No, if you’re on a version prior to 1.21 or prefer manual crafting, you can simply collect the dried kelp in a chest and craft the dried kelp blocks by hand. However, the Crafter (1.21+) makes the entire fuel production loop fully automatic and self-sustaining, which is a significant quality-of-life improvement.
With this automatic kelp farm, you’ll have an endless supply of efficient fuel, freeing you up to explore, build, and conquer other challenges in your Minecraft world!

