How to Cure a Zombie Villager in Minecraft for Massive Trade Discounts
Why Cure Zombie Villagers? The Economics of Discounts
In Minecraft, trading with villagers is the most reliable way to obtain enchanted books, diamond gear, emeralds, and rare blocks. However, the default prices can be steep-sometimes 64 emeralds for a single mending book. Curing a zombie villager (converting it back to a normal villager) applies a permanent major discount to all trades from that villager and any villager nearby. This discount stacks with hero of the village and can reduce costs by up to 90%.
Beyond saving resources, cured villagers often offer trades that are extremely cheap: a single rotten flesh for an emerald, or one paper for an emerald. This makes mass trading possible with minimal investment. The process is also essential for building a thriving village, as zombie villagers are a renewable source of villagers without breeding.
Prerequisites: What You’ll Need
Before you attempt a cure, gather these items. Missing one can turn a successful cure into a disaster.
- Splash Potion of Weakness – Requires a brewing stand, blaze powder, nether wart, a water bottle, and a fermented spider eye. Alternatively, you can find these potions in ruined portal chests or cleric villagers.
- Golden Apple – Crafted with 8 gold ingots around an apple. Gold is abundant at y=-16 but requires smelting. You can also find golden apples in chests.
- Safety gear – At least iron armor, a sword, and a shield. Zombie villagers attack like normal zombies but are slightly slower.
- Empty buckets or leads – To move the zombie villager to a safe location.
- Nametag (optional but recommended) – Allows you to name the villager so it doesn’t despawn.
- Torches and building blocks – To secure the area and prevent sunlight from burning the zombie (it will take damage during daytime).
If you are in a biome where zombie villagers spawn rarely (e.g., desert), you may also want to create a zombie spawner farm or use a discount raid farm to get multiple victims.
Step-by-Step Guide to Curing a Zombie Villager
Step 1: Find or Create a Zombie Villager
Zombie villagers spawn in the overworld at night (5% of zombies are zombie villagers), in igloo basements, in zombie villages, or from zombie spawners (5% change). Igloo basements always contain a zombie villager + a golden apple + weakness potion-perfect for a first cure. Otherwise, wait for nightfall, find a zombie with a large nose and green skin, and either trap it or lure it away from other zombies.
Pro tip: If you have a zombie spawner, block all spawning spaces except one and create a water stream to push the zombie villager into a holding cell. Then kill the normal zombies manually or with a fall trap.
Step 2: Secure a Safe Curing Location
The zombie villager will become hostile once you throw the weakness potion. It will also wander and can be killed by accidental sunlight or other mobs. Build a small enclosure (2x2x2 is enough) using solid blocks, with a ceiling to block sunlight. Place a bed for the future villager (not required but speeds up the cure and prevents it from wandering later). Make sure there are no gaps where a baby zombie or spider can enter.
If you are in a multiplayer world, also prevent other players from killing it accidentally-communication is key.
Step 3: Apply the Splash Potion of Weakness
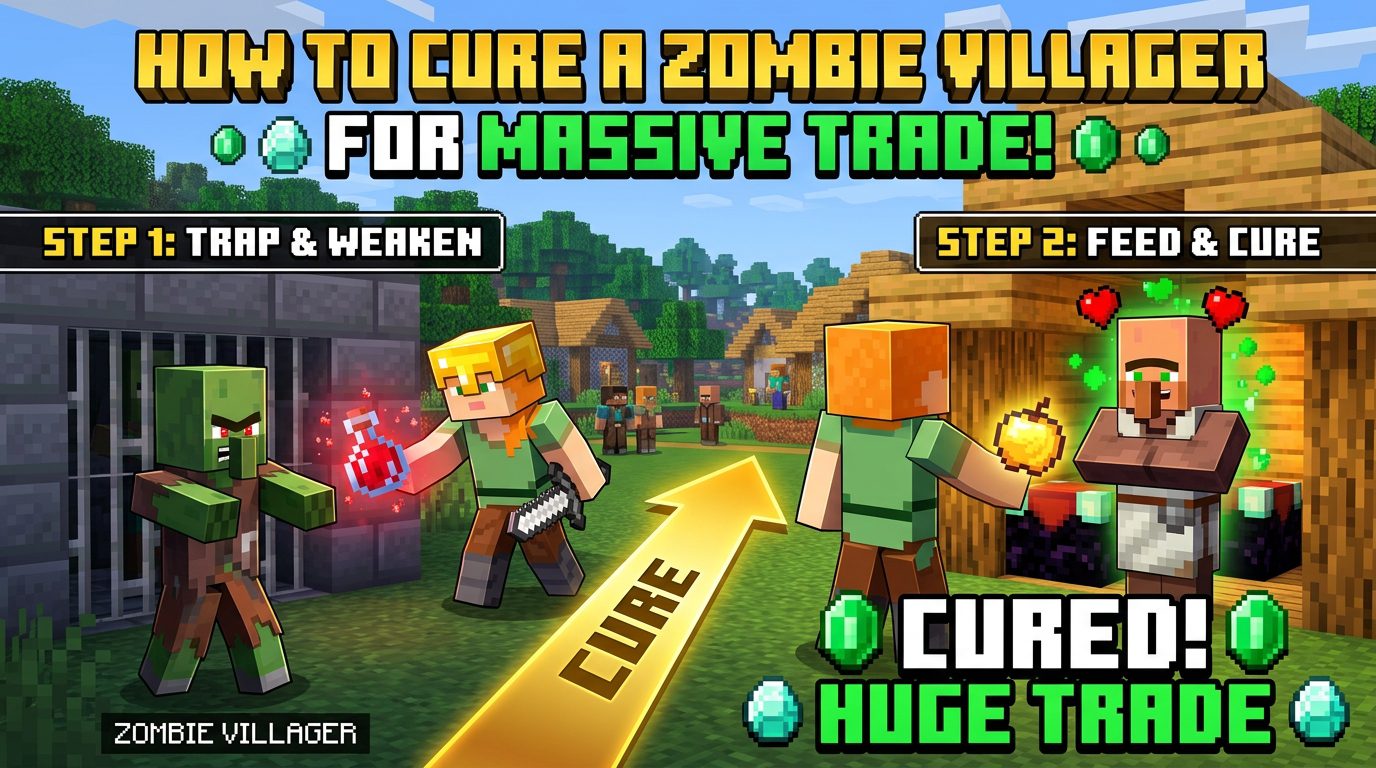
Stand close to the zombie villager (within 2-3 blocks) and throw the splash potion directly at it. Alternatively, you can use a lingering potion by throwing a regular weakness potion at a dragon breath, then standing the zombie in the cloud. The splash method is simpler. Once hit, the zombie villager will shake and have a purple particle effect, and its health will drop drastically (it turns into a weak zombie). This is the critical moment-it will still attack you.
Common mistake: The weakness effect lasts 1:30 for a splash potion. If you don’t feed the golden apple within that time, the zombie villager will remain a zombie. Keep a clock or count seconds. Use a fermenting eye to make the potion last longer if needed (8:00 for extended weakness).
Step 4: Feed the Golden Apple
Right-click (or press use) on the weakened zombie villager with a golden apple selected in your hotbar. Similar to feeding a tamed wolf, the animation shows the apple being consumed. The zombie villager will then emit red particles and start shaking. After a few seconds, it will turn into a normal villager, but still hostile? Actually no-immediately after feeding, the zombie villager becomes passive and will start converting. Do not hit it; it cannot be damaged during conversion. The conversion takes 3–5 minutes (random).
During this time, the zombie villager will twitch and make zombie noises. Place a bed nearby; once cured, it will claim a bed (if available). Also, if there are no beds, it might wander and get attacked. Use nametags before curing, or after the cure.
Step 5: Protect the Curing Villager
The conversion is fragile. Any zombie or zombie villager that hits it will reset the timer. Hostile mobs can also kill it. Light up the area around the curing chamber. If you are in an open field, build a fence or trapdoors to keep it safe. Also, do not let it fall into water or lava-it will drown or burn.
Once cured, the villager will have a brown robe (Swamp biome) or normal biome-appropriate clothing. It will immediately have trades that are heavily discounted-often starting at 1 emerald for multiple items.
Understanding the Discount Mechanics
The discount is not just a flat reduction. It works through a NBT (Named Binary Tag) value called “Gossip” with a type of “major_positive”. When a player cures a zombie villager, that player gains +20 reputation points with that villager. These points reduce all trade prices by 10% per 10 points (capped at -30% for reputation). Additionally, the villager gains a hidden “discount” that stacks. Tests by the Minecraft community (e.g., Reddit u/Minecraft_Brewer) show that a single cure gives a permanent 20%–30% discount on all trades, and multiple cures on the same villager can stack up to 1 emerald for books. However, the discount from curing is independent of gossip; it’s a special “trading discount” that persists forever.
Furthermore, when a villager is cured, nearby villagers in a 16-block radius also get a minor positive gossip (usually 5–10 points). This means curing one zombie villager can lower prices for an entire trading hall. The effect multiplies: curing 5-6 zombie villagers in the same area can drop prices to the absolute minimum (1 emerald for most items). This is the foundation of massive trade discount farms.
Important: The discount is applied to the villager’s first trade slot for each profession. It does not retroactively affect already traded items, but once you trade with the villager, the prices lock in? Actually, curing resets the trading cycles? No-curing only applies a permanent discount factor. You still need to unlock new trades by trading. But with a cured villager, unlocking new trades is cheaper because the base cost is lower.
Advanced Strategies for Maximum Discounts
1. Multiple Cures on the Same Villager
Yes, you can cure a villager, let it become a normal villager, then convert it back to a zombie villager (by killing it? Actually, a zombie villager can be created by a zombie killing a normal villager on Hard difficulty, or by a zombie making a villager drown?). The most reliable method is to use a zombie infection: on Hard difficulty, a zombie has 100% chance to convert any villager it kills into a zombie villager. So you can infect a cured villager, cure it again, and stack discounts. Each cure adds another hidden discount multiplier. After 4-5 cures, you’ll get trades like “1 rotten flesh / 1 emerald” or “1 paper / 1 emerald”. This is known as the “infinite discount exploit” and is patched in some snapshots? As of 1.20+, it still works.
How to do it safely: In a controlled environment, bring a normal zombie (not a zombie villager) near the cured villager with Hard difficulty. The zombie will kill the villager, which will spawn a zombie villager. Quickly trap or separate the new zombie villager. Then repeat the weakness + golden apple process. The discount compounds. This requires iron armour, a quick hand, and a way to prevent the zombie from killing the villager completely (e.g., a sword with knockback to keep the zombie away until conversion). Alternatively, use a dispenser with a splash potion of weakness to immobilize the zombie.
2. Hero of the Village Stacking
After curing villagers, trigger a raid (bad omen from pillager captains) and defeat it. The Hero of the Village effect further reduces trades by 30%–50% depending on raid level. Combined with curing discounts, you can get items for 1 emerald each. This is especially useful for emerald trades like buying bookshelves, glass, or quartz.
3. Curing in Bulk – The Discount Trading Hall
Build a multi-cell curing facility. Use a zombie spawner or a spawn platform to produce zombie villagers. Have a dispenser with splash weakness potions and a hopper system to feed golden apples automatically (using a dropper that shoots the apple when you press a button). For each zombie villager, you repeat the process. After you have 10–20 cured villagers with different professions, you have a discount trading hall where you can obtain anything cheaply.
Common Mistakes and How to Avoid Them
- Not curing within time limit: Always have the golden apple in your hand immediately after throwing the potion. Use extended weakness potion (redstone dust + fermented spider eye) to give 8 minutes.
- Letting the zombie villager die in sunlight: During the day, the zombie villager will burn. Remember to roof your curing chamber or work at night.
- Trying to cure in a village with existing villagers: Iron golems will attack the zombie villager and can kill it. Move it away.
- Not naming the villager: If the chunk unloads, the zombie villager might despawn. Use a nametag.
- Incorrect potion strength: Splash potion of weakness II (glowstone dust) does not exist for weakness; the only effect is poison. So standard weakness potion is fine.
- Accidentally hitting the villager during conversion: This resets the timer. Use a block to separate yourself, or just wait.
Frequently Asked Questions
Q: Can I cure a zombie villager that already has a profession?
A: Yes. The zombie villager retains its profession (if it had one before conversion) but will lose it when cured. After cure, it will be an unemployed villager again. You then need to assign a job site block to give it a trade.
Q: Does curing work in Bedrock Edition?
A: Yes, the mechanics are nearly identical. In Bedrock, curing discounts are even more generous (up to 1 emerald for single items) and the cure time is 3–5 minutes. However, the zombie villager can burn in daylight on Bedrock too.
Q: Can I cure a zombie villager that is a baby?
A: Yes, baby zombie villagers can be cured. They will then be baby villagers, which grow up after 20 minutes. The discount applies the same.
Q: Does the discount apply to trades from a wandering trader?
A: No. Wandering traders are separate mobs from villagers.
Tags:
YOU MAY ALSO LIKE...