Copper Door Oxidation Visual States
Many Minecraft builders, eager to incorporate the striking verdigris of oxidized copper into their designs, often encounter a surprising hurdle: copper doors, specifically, can take significantly longer to reach their final green state compared to other copper blocks. This nuanced behavior is just one facet of the intricate oxidation system that governs these dynamic building materials, offering both creative opportunities and potential frustrations for the unwary.
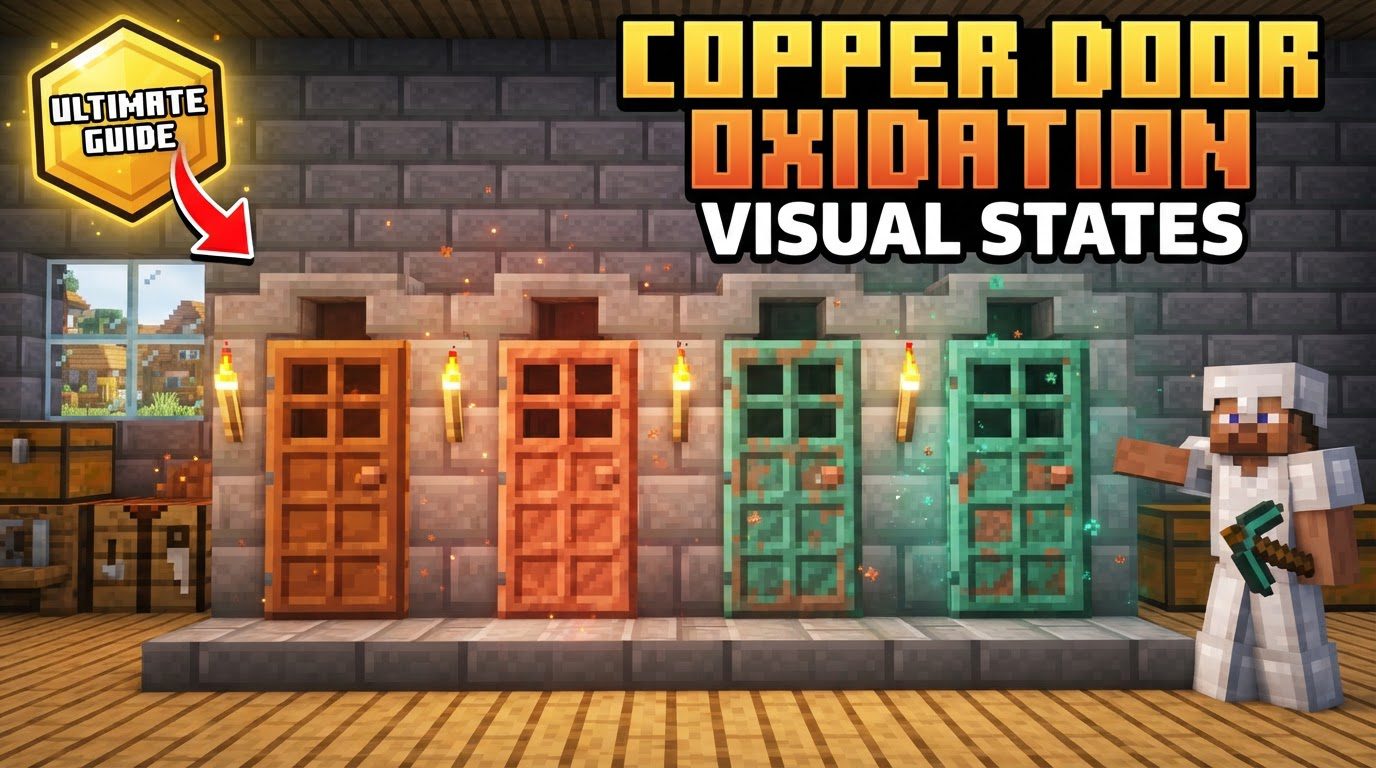
Understanding the visual stages and the underlying mechanics of copper oxidation is crucial for any builder looking to harness the unique aesthetic appeal of copper doors. From their initial gleaming reddish-brown to their final, completely green form, these doors undergo a fascinating transformation, each stage offering distinct decorative possibilities.
The Evolving Aesthetics: Four Stages of Copper Door Oxidation
Copper doors, like all copper blocks in Minecraft, don’t just magically turn green overnight. They embark on a gradual journey through four distinct visual phases, each contributing to the block’s evolving character. Appreciating these stages is key to planning your builds and knowing when to intervene.
- Copper: The Pristine Beginning
This is the default, unoxidized state. Freshly crafted, the copper door gleams with a bright, reddish-brown hue, characteristic of new copper. It offers a warm, industrial look, perfect for modern or steampunk-inspired builds. - Exposed Copper: The First Hint of Green
As the oxidation process begins, the door transitions to “Exposed Copper.” At this stage, you’ll notice a subtle, almost mottled greenish tint starting to appear on the surface. It’s a delicate change, indicating the copper is beginning to react with its environment. This stage can provide a gently aged appearance. - Weathered Copper: A Pronounced Patina
Moving further along the oxidation spectrum, the door becomes “Weathered Copper.” Here, the green is far more noticeable and covers a significant portion of the door’s surface. The original reddish-brown is still visible in places, but the verdant patina is now the dominant feature. This stage often offers a rustic, aged look without being fully consumed by green. - Oxidized Copper: The Final Verdigris
The culmination of the oxidation process is “Oxidized Copper.” At this point, the door is entirely covered in a vibrant, often described as verdigris or aqua blue, green. All traces of the original copper color are gone, replaced by a uniform, striking green. This is the most iconic and sought-after stage for many builders seeking a classic, ancient, or highly stylized aesthetic.
The Subtle Science of Spontaneous Greening
The transformation of copper doors isn’t just a visual trick; it’s governed by specific game mechanics. Understanding these allows for greater control over the oxidation process.
- Random Ticks and Initial Oxidation
The oxidation process is initiated by “random ticks,” which occur approximately every 68 seconds on average within loaded chunks. When a random tick hits a copper block, there’s a 5% chance it will advance one stage in its oxidation. This means the process is inherently unpredictable but constant over time. - Environmental Influence: Air and Neighbors
A critical factor influencing oxidation speed is the surrounding environment. A copper block, including a door, has a higher probability of oxidizing if it is surrounded by more air blocks or non-copper blocks within a four-block radius. Conversely, if there are other copper blocks within this radius that are at the same or a lower oxidation stage, the oxidation process for that specific block will be significantly slowed down or even temporarily halted. This is particularly relevant for copper doors, which are two blocks high, meaning the top and bottom halves can influence each other’s oxidation rate, potentially contributing to their slower overall transformation. - Dispelling the “Spreading” Myth
A common misconception is that oxidation “spreads” from one block to another. This is incorrect. Each copper block independently assesses its surroundings during a random tick. While neighboring copper blocks affect the probability of oxidation, the greening effect doesn’t literally spread; rather, each block oxidizes based on its own internal checks and environmental factors.
Mastering the Metamorphosis: Controlling Oxidation
Minecraft provides powerful tools to either accelerate, halt, or even reverse the oxidation of your copper doors, giving you complete creative freedom over their appearance.
- Halting the Change: Waxing Copper
The most direct way to preserve a copper door’s appearance at any desired stage is by “waxing” it. Simply right-click on the copper door with a honeycomb in your hand. This action will apply a wax coating, permanently stopping its oxidation at its current visual state. Once waxed, the door will remain in that stage indefinitely, unaffected by time or environmental factors. It’s often more efficient to wax copper blocks before crafting them into doors or other items, especially if you have a large build in mind. - Reversing Time: Scraping Oxidation
If you’ve let a copper door oxidize too far, or simply wish to revert its appearance, an axe is your tool. Using an axe on an oxidized copper door will “scrape” off one layer of oxidation, reverting it to the previous visual stage. For example, an Oxidized Copper door will become Weathered Copper. If a waxed copper door is scraped, the wax layer is removed first, allowing the oxidation process to resume from its current stage. - The Power of the Storm: Lightning’s De-oxidizing Effect
In a dramatic and less predictable turn, lightning strikes can also affect copper oxidation. A direct lightning strike on a copper block will instantly de-oxidize it completely, returning it to its initial “Copper” state. Furthermore, nearby non-waxed copper blocks can also be randomly de-oxidized to varying degrees by a lightning strike in the vicinity. Crucially, waxed copper blocks are entirely immune to lightning’s de-oxidizing effect, reinforcing the permanence of waxing.
Expediting the Patina: Speeding Up Oxidation
For builders who want to achieve the fully oxidized green look quickly, there are strategies to encourage faster transformation.
- Maximizing Air Exposure
To significantly increase the rate at which your copper doors oxidize, ensure they have ample space around them. Placing copper blocks or doors with at least four or five blocks of air in between them will maximize the chances of random ticks advancing their oxidation. Avoid placing them directly adjacent to other copper blocks, especially those at a lower oxidation stage. - The “Oxidizing Chamber” Concept
Consider building an “oxidizing chamber” in an area where you frequently spend time, such as near your base or an AFK spot. Oxidation only occurs within the player’s loaded chunks and simulation distance. By placing your copper doors (or blocks) in such an active area with maximum air exposure, you ensure they are constantly being subjected to random ticks, thus speeding up the process. - Debunking Environmental Myths
It’s a common misconception that water or rain accelerate copper oxidation in Minecraft. Unlike in the real world, these elements have absolutely no impact on the oxidation rate of copper blocks in the game. Similarly, copper blocks can and will oxidize just as readily underground as they do on the surface, provided they are within loaded chunks.
Strategic Crafting and Common Blunders to Avoid
Beyond the oxidation process itself, there are practical considerations and common mistakes to be aware of when working with copper doors.
- The Efficiency of the Stonecutter
When working with copper, especially for larger builds, using a stonecutter to craft cut copper variants (like cut copper blocks, stairs, and slabs) is far more material-efficient than a crafting table. A stonecutter yields four times more products from a single copper block, saving valuable resources. While copper doors are crafted directly from copper blocks on a crafting table, this tip applies to other copper building elements you might pair with your doors. - The Peril of Forgetting to Wax
Perhaps the most common mistake is neglecting to wax copper doors once they reach your desired oxidation stage. Many builders meticulously wait for their doors to achieve that perfect weathered look, only to forget the final step, leading to the doors eventually becoming fully oxidized – sometimes past the point of their intended aesthetic. Always keep honeycomb handy! - Understanding Slower Door Oxidation
As mentioned earlier, copper doors can appear to oxidize slower than individual copper blocks. This is likely due to their two-block height. The game might treat the upper and lower halves of the door as adjacent copper blocks influencing each other, which, according to the mechanics, can slow down the oxidation process for both halves. Patience is often required when waiting for doors to reach their final green state.
Conclusion: Harnessing Copper’s Unique Charm
Copper doors, with their dynamic oxidation states, offer an unparalleled opportunity for creative expression in Minecraft. From the bright, clean lines of unoxidized copper to the deep, historical patina of its fully green form, each stage presents a distinct aesthetic for your builds. By understanding the random tick system, the influence of surrounding blocks, and mastering the techniques of waxing, scraping, and even leveraging lightning, you gain complete control over this natural transformation. Embrace the slow, deliberate process, or strategically accelerate it; the evolving beauty of copper doors awaits your architectural vision.
Tags:
YOU MAY ALSO LIKE...